3. TMPGEnc (powerful encoder)
Run "TMPGEnc.exe" ...
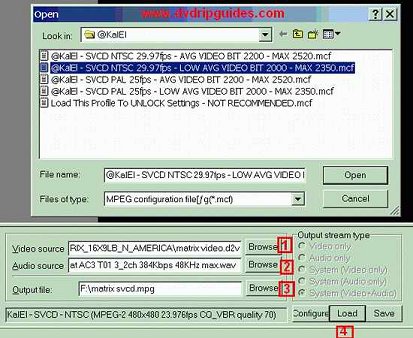
1. At the bottom of program next to Video source, select browse
and find your .d2v file from DVD2AVI.
2. For audio source, find your .wav file.
3. Make sure you save the output file to a drive with plenty
of space on it.
4. Press load and select one of my SVCD templates already customized
for NTSC or PAL sources and press Open. (Please make sure you
select the correct one.. NTSC or PAL.)
What template should I use?
NTSC FILM - Target encode to 23.976fps - This template
should be used if you used "Forced Film" in DVD2AVI
and it gave you a number of 95% FILM or higher (highly recommended)
:: OR :: you had "Forced Film" OFF and
wish to perform "Inverse Telecine" to encode at
23.976fps (should be used only in case of DVD2AVI Film Type
less than 95% or serious interlacing)
NTSC - Target encode to 29.97fps - This template should
be used if you had "Forced Film" OFF in DVD2AVI
:: AND :: you wish to encode at 29.97fps instead
of 23.976 (not recommended as more frames means more encoding
time, bigger file, and less quality)
PAL - 25fps - Simplest of them all. (Perfect At
Last :)
Quick note about my SVCD templates: The "Low" templates are
new and by request, can fit more minutes into one CD, but of
course, at lower quality which is still kickass. This is the
template setting I myself have begun to use in order to get
a 2hr movie to fit 3 - 74min CDs.
:: Please follow the instructions that apply
below ::
NTSC:
 If
you loaded either NTSC-Film or the NTSC template.
Click on configure. Please do not change any of the settings
in the main tab. They are most likely locked anyway. Go to
the advanced tab and use these settings below, after you set
them, you may go to the bottom of the page. If
you loaded either NTSC-Film or the NTSC template.
Click on configure. Please do not change any of the settings
in the main tab. They are most likely locked anyway. Go to
the advanced tab and use these settings below, after you set
them, you may go to the bottom of the page.
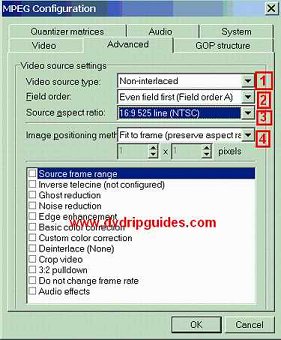
In this picture: (Remember, this is NTSC sources only)
1. Forced Film ON = Non-Interlaced
Forced Film
OFF = Interlaced
2. Forced Film ON = Does not matter,
there are no fields.
Forced Film
OFF = This setting is incredibly important. Most
of the time it is "Field Order A" but to be safe,
you check on the Deinterlace box at the bottom and double
click the word Deinterlace. In the new window that opens
up, leave it set to "None" but now use the slider
to see a couple seconds of the picture in slow motion.
If the picture ever doubles back to repeat something, then
you have the wrong field order and it should be set to "Field
Order B". Otherwise, you're good with "A".
Remember to disable Deinterlace.
3. The source display aspect ratio
(DAR) should be either 16:9 525 line, OR 4:3 525 line.
DVD2AVI or SmartRipper or even the movie box/dvd can tell
you this.
4. "Fit to Frame: Preserve
Aspect Ratio" (NOT 2!)
IVTC: This portion is only if Forced Film was OFF
in DVD2AVI for an NTSC source BUT you wish to encode to
23.976fps (NOT 29.97fps):
Click the checkbox for Inverse Telecine. DOUBLE-CLICK on
the words "Inverse Telecine" to configure it.
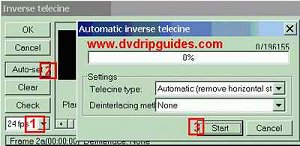
This new window opens up.
[1]. The FPS there should be 24.
[2]. Click on Auto-Set on the left. And in the OTHER window
that opens up, choose "Automatic (Remove Horizontal Stripes)"
... in the newest versions, this is referred to as 24fps -
Flicker Priority. Deinterlacing should be "None".
[3]. Press "Start" .. and this will take a while depending
on length of movie (HOURS!). Update: Newer
versions of TMPGEnc have "Enable while encoding":
definately not recommended.
When it's done with the process, press OK.
PAL:
Lucky guys! hehe, you don't have to put up with
all this nonsense. Ok, load up one of my SVCD PAL templates,
click on Configure and go to the advanced tab. The settings
should be the same as the picture of the Configuration up
top EXCEPT for [3] Source Aspect Ratio. This should be either
PAL 4:3 625line or PAL 16:9 625line.
Return to Normal Instructions:
Ok, you made it this far. Congratulations. Just a quick explanation
for NTSC users: The goal of this guide is to burn the video
23.976fps, NOT 29.97... 23.976fps has higher quality, is faster
to encode (less frames) and is smoother if done properly. For
this reason, I highly recommend using Forced Film in DVD2AVI.
Now you have a decision to make... do you want great quality?
or INCREDIBLE quality? In the VIDEO tab of the configuration,
you can either use TMPGEnc's Automatic VBR OR You can take the
time to use 2Pass VBR! It does take twice the time, but the
quality is great. If you don't have the time, I suggest you
go with automatic and maybe some day try 2Pass if you're bored.
The other option is "Motion Search" at the bottom of the Video
tab when you go to Configure. Trust me, High Quality (slow)
is INCREDIBLE! (I do not recommend "Highest - Slowest" because
there is almost absolutely nothing different than High but about
6-7 more hours of encoding.)
Finally, check the setting for your output file, make sure you
have plenty of space on the partition/drive it is going to.
Press Encode on the top left corner and once again.... sit back,
and relax for a llllonnnnnggggggggg time.
<- Step 2 Step
4 ->
|